Creating Documents in HireHop – Documents as PDF and printing

イベントレンタルソフトウェアの見積もりドキュメントHireHop has a very powerful document engine, enabling you to make professional and amazing looking documents, however even though it is powerful, it is very easy to use.

Documents are all standard HTML, and fully support CSS and JavaScript, even when HireHop converts them to a PDF.

There are numerous standard templates available, and every template can be customised if you are a paying HireHop subscriber.

Document Types

A document will only be available in certain appropriate places in the software, and in certain circumstances, for example a Job Quote document will only appear when you are in a job, and not when in Stock Management or a Project.  Another example is a job invoice document will only appear when an authorised invoice is selected in the Billing tab, so if the invoice is not authorised, the invoice document will not appear.

Document Templates

In Settings->Documents, you can add a new template document or edit existing documents.  All template documents have a padlock icon on the grid row, but if you edit one, it creates a copy as new document.  Template documents (the ones with padlock icons) are fine to delete as you can always easily add them back again.  Documents without the padlock icon are custom documents and cannot be retrieved once you delete them, so it is advised to keep backups.

Editing a Document

HireHop does have an inbuilt HTML editor, however this is very basic and it is recommended to use the “Source” view as much as possible.

HireHop documents have merge fields which are prefilled with the appropriate data by HireHop when you print, download or email a document.  The list of fields and explanation on how to use them can be found at https://myhirehop.com/modules/docmaker/fields.php.

Interfacing With The API

Instead or as well as using merge fields, documents in HireHop can also talk with the HireHop API, and pull data raw straight from the software.  Please note that this will not work for shared link documents for security reasons.  HireHop documents can also communicate with third party APIs and even load and use JavaScript frameworks.

As an example of a document getting its data using the API, copy the code from the document at https://myhirehop.com/docs/job_info.html, and paste it into a job document.  The output is not very interesting, it is just a dump of data received from the server using the API.

You can also post (send) data in a document, which is what the signature request document does.  Another example is the code below, so when you print or email a quote document, by adding the code below into the quote document, it will automatically create an archive every time the document is opened in a new tab, downloaded as a PDF or emailed as a PDF.

<script>
	// Save the supplying list as a quote once the document has finished loading
	window.onload = function() {
		var http = new XMLHttpRequest(),
		    job_id = document.getElementById("number").textContent,
		    now_str = (new Date()).toLocaleDateString(),
		    params = "job=" + job_id + "&desc=" + encodeURIComponent("Quote sent - " + now_str);
		http.open("POST", "/php_functions/archive_insert.php");
		http.setRequestHeader("Content-type", "application/x-www-form-urlencoded");
		http.send(params);
	}
</script>

Documents as PDFs

HireHop uses two engines to render documents as PDFs, being Chromium, which is used by Google Chrome and Microsoft Edge, or WebKit which is the base for the Apple Safari browser.  WebKit is far older and not maintained anymore, and does not support HTML5 as well as Chromium does, however it is a lot faster when creating PDF documents due to its simplicity, so if it looks fine using Webkit, it is advised to that.

Document Stationery

When printing or emailing PDF documents with HireHop, you can add stationery that the document will be overlaid onto.  Stationery is uploaded as PDF files in Depot Management, and so it is different for each depot (including virtual depots).

The stationery pages get added to each applicable page of a document, and the last stationery page is then repeated for all remaining document pages.  As an example, with a one page stationery document, it will be placed behind every page of the document.  If the stationery is a two page PDF, the first page of the stationery will appear behind page one of the document, and the second page behind page two, and all other subsequent document pages.  Stationery can have as many pages as you want.

HireHop Rest API – スタートガイド

HireHopはAPIの上に構築されています。つまり、HireHopが行うことはすべて、広範なAPIを使用して実行することもできます。 Rest APIにアクセスするために必要なのは、関連するURLエンドポイントにGETまたはPOSTとして適用されるユーザートークンだけです。

APIトークン

APIトークンを生成するには、[設定]ページに移動し、[ユーザー]タブを選択します。ユーザーを選択または作成し、その特定のユーザーを選択した状態で、[メニュー]ボタンをクリックし、[APIトークン]オプションをクリックしてトークンを生成します。トークンが表示され、コピーボタンを使用してクリップボードにコピーできます。

選択したユーザーのメールアドレスまたはパスワードを変更した場合、またはその後そのユーザーにログインした場合、トークンは無効になります。これを防ぐには、専用のAPIユーザーを作成し、セキュリティのために関連する権限を付与して、APIを使用しないものからユーザーを制限する必要があります。

セキュリティ上の理由から、フロントエンドのJavaScriptコードでトークンを使用しないでください。ハッカーがトークンを取得した場合、HireHopのデータを変更してアクセスできるため、トークンは秘密にしてください。サーバー側でのみ使用してください。トークンが漏洩した場合は、APIユーザーのパスワードを変更して新しいトークンを生成するだけです。

トークンの使用

トークンは、「トークン」と呼ばれるGETまたはPOSTパラメーターとして設定する必要があります。たとえば、ジョブ番号52のジョブデータをロードするために、HireHopはAPIエンドポイントを呼び出します。

https://myhirehop.com/php_functions/job_refresh.php?job=52

トークンを使用して同じエンドポイントを呼び出す場合、URLは次のようになります。

https://myhirehop.com/php_functions/job_refresh.php?job=52&token=dqwejk5GVT65909bHHBN7922pq5hxjm%207hmn

GET(上記のようなURLパラメーター)を介してトークンを渡す場合は、最初にhttps://meyerweb.com/eric/tools/dencoderなどのツールを使用してトークンをエンコードする必要があることに注意してください。

データの投稿

HireHopでデータを作成または編集するには、POSTを使用する必要があります。データを投稿するときは、変更するフィールドのみを設定する必要があります。たとえば、エンドポイントhttps://myhirehop.com/php_functions/job_save.phpを使用してジョブを作成または編集し、パラメータ「job」を「0」に設定します。 “またはそれを省略すると、新しいジョブが作成されます。それ以外の場合は、関連するジョブ番号が編集されます。したがって、ジョブ番号52の会社名を編集するには、投稿データは次のようになります。

{
"job" : 52,
"name" : "New Name",
"token" : "dqwejk5GVT65909bHHBN7922pq5hxjm=-7hmn"
}

API エンドポイント

多くの API エンドポイントが API ドキュメントに記載されています。タスクのエンドポイントを確立するには、HireHopアプリケーションで、ブラウザーコンソールを使用して、ネットワーク呼び出しと設定されているパラメーターを検査します。 URLエンドポイントの広範なガイドがまもなく公開されます。

レート制限

HireHop では、各ユーザーが 1 分間に 60 回の接続要求を許可します。 60 を超える場合は、「セキュリティ警告、トランザクションが多すぎます」(327) エラーが返されます。

Posted in API

クロスドメインフォントCORS – CSS font-faceが読み込まれない

多くのユーザーが、HireHopで使用するためにHTML5、JavaScript、CSSの機能を利用して素晴らしいドキュメントをいくつか作成しています。これらのドキュメントの場合、ユーザーはサーバーに保存する特別なフォントを必要とする場合がありますが、フォントがHireHopドキュメントで機能しない場合があります。これは、ブラウザーでのクロスオリジンリソースシェアリング(CORS)の制限が原因です。

フォントがドキュメントに読み込まれない

ほとんどのWebブラウザーはクロスドメイン要求を許可しません。これは、同じ発信元のセキュリティポリシーが原因です。つまり、別のドメインのウェブフォントを使用すると、エラーが発生し、ブラウザやHireHopドキュメントでフォントが読み込まれないことがあります。

<style type="text/css">
@font-face {
    font-family: 'OpenSans';
    src: url('https://my_server.com/fonts/OpenSans.woff2') format('woff2');
}
html, body{
    font: normal 16px OpenSans, sans-serif;
}
</style>

ソリューション

フォントのクロスオリジン制限を修正するには、フォントファイルをホストするリモートサーバーからの応答に、Access-Control-Allow-Originヘッダーを含める必要があります。

TypekitGoogle Fontsなどのフォントサービス、またはBootstrapCDNCdnJSJsDelivrなどのコンテンツ配信ネットワークを使用して好みのフォントを読み込む場合、Access-Control-Allow-Originヘッダーは何もしないので、何もする必要はありません。すでに応答ヘッダーで送信されています。

Apache

Apacheウェブサーバーを設定するには、次のコードを httpd.confまたは.htaccessファイルに挿入します。

  1. ApacheにMIMEタイプのヘッダーを追加します。
    AddType application/vnd.ms-fontobject    .eot
    AddType application/x-font-opentype      .otf
    AddType image/svg+xml                    .svg
    AddType application/x-font-ttf           .ttf
    AddType application/font-woff            .woff
    AddType application/font-woff2           .woff2
    
  2. MIMEタイプのApacheでクロスオリジンリソースシェアリング(CORS)を有効にします。
    <IfModule mod_headers.c>
      <FilesMatch ".(eot|otf|svg|ttf|woff2?)$">
        Header set Access-Control-Allow-Origin "*"
      </FilesMatch>
    </IfModule>
    

NGINX

NGINXウェブサーバーを設定するには、次のコードを/etc/nginx/nginx.confまたはカスタムの/etc/nginx/conf.d/custom.confファイルに配置します。

  1. NGINXにMIMEタイプのヘッダーを追加します。
    application/vnd.ms-fontobject    eot;
    application/x-font-opentype      otf;
    image/svg+xml                    svg;
    application/x-font-ttf           ttf;
    application/font-woff            woff;
    application/font-woff2           woff2;
    
  2. MIMEタイプのNGINXでクロスオリジンリソースシェアリング(CORS)を有効にします。
    location ~* .(eot|otf|svg|ttf|woff|woff2)$ {
        add_header Access-Control-Allow-Origin *;
    }
    

IIS

Microsoft IISを設定するには、次のコードを web.config system.webServerブロックに追加します。

  • IISでクロスオリジンリソースシェアリング(CORS)を有効にする
    <system.webServer>
      <httpProtocol>
        <customHeaders>
          <add name="access-control-allow-origin" value="*" />
          <add name="access-control-allow-headers" value="content-type" />
        </customHeaders>
      </httpProtocol>
    </system.webServer>
    

PHP

サーバー設定を変更できない場合は、いつでもPHPを使用してフォントファイルを配信できます。

  • 物理フォントファイルではなくサーバースクリプトファイルを使用する
    <style type="text/css">
    @font-face {
        font-family: 'OpenSans';
        src: url('https://my_server.com/fonts/OpenSans.php') format('woff2');
    }
    html, body{
        font: normal 16px OpenSans, sans-serif;
    }
    </style>
    
  • PHPでクロスドメインの@ font-faceの問題を修正する方法
    <?php
    // fonts.php
    header('Access-Control-Allow-Origin: *');
    header('Content-Type: application/font-woff2');
    echo @file_get_contents('/fonts/OpenSans.woff2');
    ?>
    
Posted in API

Customisation & Customising Widgets – HireHop API NoHTML Framework

HireHop is completely customisable, you can even add custom fields, all done using the HireHop JavaScript injection method, in which JavaScript files that you have written are inserted into HireHop pages.  If you look at the page source of a HireHop page, you will see <!– PLUGINS –>, it is after here where the JavaScript for your plugins will be inserted.

HireHop has been built from the ground up, developing our own framework that we call NoHTML, amalgamating existing technology and methodology to produce a framework that is easy to use, extendable and enables fast page loading, even on slow internet connections.

Apart from the main part of the page, the main parts of HireHop are dynamically built on the client machine using JavaScript and jQuery widgets, similar to REACT and JSX, but more simple and of course using the familiar jQuery framework.  For instance, if you load a Job page and inspect the page (press F12 for the browser’s object inspector), you will see a <div> element at the bottom of the page structured like so:

<div id=”notes_tab“></div>

As you can see the above <div> is just an empty div element. If you click on the “Notes” tab, suddenly the above element is populated with elements.  Looking at your browser’s inspector you will also notice that the only data loaded from the server was some JSON and not the code in the notes tab.  The notes tab was built dynamically on the client machine using a custom jQuery UI Widget called $.notes() (internally called $.custom.notes) that is defined in the file /js/notes.js, and that widget used an ajax call to the server to get the data to populate it.

All the widget files on HireHop are compressed for speed, however to see the expanded source just add a .MAX to the end of the file’s name, for instance /js/notes.MAX.js.

To inject JavaScript into your webpages, if you go to Settings->Company Settings, and in Plugins add the url of your JavaScript file, which should be on an https server.  You can add multiple URLs which you can separate with a “;” (semi-colon).  All URLs must be to a secure https domain.

Extending A Widget

As these are jQuery UI Widgets, you can use a type of Object Orientated programming technique to overwrite parts of the HireHop widgets. For example, we are going to create a small plugin that adds a span element with the word Hello after the Refresh button on the notes widget.

First create a JavaScript file on your web server and add the following code

$(document).ready(function(){
// Check if the notes widget exists
if(typeof($.custom.notes)!=”undefined” && hh_api_version<=1) {
// Redefine notes widget
$.widget(“custom.notes“, $.custom.notes, {
_init_main: function() {
// Call the old _init_main
this._super(arguments);
// Add an hello after the refresh button
$(“<span>“,{ html:” Hello” }).insertAfter(this.btnRefresh);
},
// Even add your own new functions into the widget if you want

new_function_name: function() { }
});
}
});

The above code is available in a file located at https://s.myhirehop.com/plugins/demo.js.

Explaining the code above line by line:

$(document).ready(function(){
First we wait for the document to be ready and all page elements and JavaScript files to be loaded.  In this case this is not necessary as the /js/notes.js file is loaded before the plugin script, however for this example we have left it in for reference.

if(typeof($.custom.notes)!=”undefined” && hh_api_version<=1) {
Next we test to see if the notes widget has been defined, if it has we will proceed to overwrite one part of it.  Here we are also testing the HireHop API version the user is using.  As new versions of HireHop are released, the user will have the option to use it and this makes sure that your plugin is compatible with that version.

$.widget(“custom.notes“, $.custom.notes, {
Here we are initiating merging of a new JavaScript object containing functions into the notes widget.

_init_main: function() {
By naming a function the same as an existing one, it will be overwritten.

this._super(arguments);
This calls the inherited function, being the function we are overwriting.

$(“<span>”,{ html:” Hello” }).insertAfter(this.btnRefresh);
We then add a simple span element containing the word “Hello” after the Refresh button. you could also use $(“<span> Hello</span>”).insertAfter(this.btnRefresh);. To address elements, you should always use the variables assigned to elements and never the element ID’s as most ID’s on HireHop are dynamically created and will be different with every instance.  If the element ID has numbers in it or is not nicely named, definitely don’t use it.

new_function_name: function() { }
Finally, this does nothing and is not necessary for what we need to do, it just demonstrates that you can even add your own functions into the widget.

When you reload the HireHop page, you will see the word Hello after the refresh button if you did everything correctly.

Versioning

A huge advantage of using the HireHop NoHTML framework is that all the JavaScript is cached, resulting in fast page loading as the browser uses the JavaScript files in its cache.  This can be problematic when you update your plugin, as all the users using it, their browsers won’t download the updated version, and instead use their cached version, that is unless they clear their browser cache.

To overcome this, when adding your JavaScript URLs to the Plugins options, you can use a versioning parameter, for example for https://www.mywebsite.com/plugin.js you would enter it as https://www.mywebsite.com/plugin.js?v=1. After an update you can then change it to read https://www.mywebsite.com/plugin.js?v=2 which will force all browsers to reload the JavaScript file from your server.  If you don’t have a server to store the code on, you can always use GIST or Google Open Source.

Posted in API

Custom Fields – HireHop API

You can have an unlimited number of custom fields in HireHop specific to each record, a record being a job, project, test/service, asset, etc.  All custom fields can be used in documents, as long as they exist, otherwise they will just be blank.

Currently custom fields are only fully supported in Jobs and Projects. Custom fields can only be used using plugins.

Custom Fields Structure

When fetching a custom field for the currently edited record, there is a function called _get_custom_field_value(field) which will return NULL if the field is not set, a string, or a JavaScript object, depending on how you saved it.

You probably should save custom fields as a JavaScript object (like JSON) in the following format for more printing control, as if it is just a string, HireHop will treat it as a string:

"field_name" :
{
"value"  : "The value of the field",
"type"   : "The field type, default is text, it can also be number, currency, text, date, html and array"
"format" : "For date type only, eg "ddd, dddddd tt" // = "Mon, January 1 2017 12:00"
}

  • value is the value of the field in any format.
  • type tells HireHop how the field should be treated when merging it into a document. An array field will be displayed as JSON.
  • format tells HireHop how to format the field in the document, currently only available dates and is dependent on the users settings and how their date and time formats are set:
    • dddddd for a long date (like January 1 2018)
    • ddddd for a short date (like 01/01/2018)
    • dddd for the day of the week (like Monday)
    • ddd for the short day of the week (like Mon)
    • tt for the time (like 12:36 am).

The format part is only needed for dates and if it is not set, nothing will show.  You can merge formats together and add separators, for instance you can use dddd, dddddd tt which will give “Monday, January 1 2018 12:00” if the user has set a date order as day month year. The value for a date type must be stored in the yyyy-mm-dd hh:mm format.

If you just save the field as a string and not a JavaScript object, that’s fine, HireHop will just treat it as a string.  Saving your custom fields as a JavaScript object will give you greater control, especially when HireHop prints them in a document.

Saving The Custom Fields

On all edit forms that support custom fields, there is a function called _save_custom_field_value(field, value).  This stores your fields to be saved later.  If you can’t find the function, please contact us.

Please note, that all changes must be written prior to saving.

When the custom fields are saved, they are merged with the existing fields, and any new fields passed with the same name as any existing ones, the new values will be set.

When saving the custom fields, for example using /php_functions.job_save.php directly as an API call, only parameters set will be updated, so if you only set the custom_fields post parameter, only the custom fields will change, all the other fields will stay as is.

Printing Custom Fields

All custom fields can be incorporated into documents just like normal fields and are prefixed with a single “_” (underscore) character.  For example, for a custom field in a job called “field_name”, you would load it by using the merge field “job:_field_name“.

Naming Custom Fields

Some custom fields in documents merge fields together, for example tests merge with an asset in some document fields, so be careful not to use the same field name in an asset and a test.  Also, other plugins maybe added in the future written by yourself or from another source, so add a prefix that denominates you, for example plugins written HireHop by use the “hh_” prefix, so a field written in a plugin by us might be called “hh_NewName”.  Field names in document merges are not case sensitive, but they obviously are in JavaScript.

Searchable Custom Field

There is an additional field called CUSTOM_INDEX, that can be used for searching, filtering and listed in search results.  The field is a 45 character string value that can be set to NULL. To enable the field to be shown in the search results on the home page, change the allSearchCols global JavaScript variable by adding CUSTOM_INDEX to it:

if(allSearchCols.constructor===Array && doc_type==0 ) {
allSearchCols.push("CUSTOM_INDEX");
}

There is also a language setting for the custom field displayed name:

if(typeof(lang["customIndexTxt"])=="undefined" || lang["customIndexTxt"]=="") {
lang["customIndexTxt"] = "Custom field name";
}

The reason for the testing for undefined or blank above is just in case the user has set it in the language.

You can use the custom searchable field in the page by adding a lookup in the page or the editor.  On jobs there is a hidden tile that displays the  CUSTOM_INDEX field and can be shown and utilised like so in a plugin:

$("#job_tile_custom_index")
.show()
.click(function() {
window.open("https://www.my_external_app.com?id="+job_data["CUSTOM_INDEX"],"newwindow");
});

To save the CUSTOM_INDEX field in the relevant edit widget, using a custom plugin you can add a form element into the edit widget, for example like so:

// This adds the CUSTOM_INDEX field into the job edit widget
if(typeof($.custom.job_edit)!="undefined") {
// Redefine job_edit, move name to after telephone
$.widget("custom.job_edit", $.custom.job_edit, {
_init_main: function() {
// Call the old _init_main
this._super(arguments);
// Add an extra edit in the job edit
var table = this.default_disc.closest("table");
var tr = $("<tr>").appendTo( table);
$("<td>", { html: lang.customIndexTxt+ " :" }).appendTo(tr);
$("<input>", {
"name" : "custom_index", // Parameter to pass when saving
"class" : "data_cell",   // Setting class to data_cell tells HireHop it is a standard data field
"data-field" : "CUSTOM_INDEX", // Name of the field
"maxlength" : 45         // The CUSTOM_INDEX has a maximum length of 45 characters
})
.appendTo( $("<td>").appendTo(tr) );
// Change the memo height to compensate
this.job_edit_memo.height(110);
}
});
}

The CUSTOM_INDEX field is called xxx:custom_index in the document and is passed as a string into the document.

Global Custom Fields

Occasionally you might want to store a global counter, etc. for the whole company.  To read and store global custom fields use /php_functions/custom_fields_global_load.php and /php_functions/custom_fields_global_save.php.  Saving the data, you need to pass either a json string or json array:

$("#saving_dialog").dialog("open");
// This adds the CUSTOM_INDEX field into the job edit widget
$.ajax({
url: "/php_functions/custom_fields_global_save.php",
type: "post",
dataType: "json",
data: {
"fields":{"my_field":"any type of value"}
// or a json string
// "field":'{"my_field":"any type of value"}'
},
success: function(data)
{
$("#saving_dialog").dialog("close");
// HireHop reported an error
if(typeof(data.error) !== "undefined")
error_message(isNaN(parseInt(data.error)) ? data.error : lang.error[data.error]);
else
{
// All good, "data" is a javascript object (JSON) of all global custom fields
}
},
// Handle an http error
error: function(jqXHR, textStatus, errorThrown)
{
$("#saving_dialog").dialog("close");
error_message(lang.error[1]+" ("+errorThrown+").");
}
});

Posted in API

Feed Stock Data to Your Website

Synchronise with the cloud

HireHop allows you to seamlessly feed stock data to your website; enabling you to list hire and rental stock on your website, with images and other data, that is synchronized with the HireHop equipment rental software’s database.

You can filter the lists (or not) by category or name, as well as sort them by name, price, weight or stock quantity held. You can also choose what format you want the export in, albeit JSON, CSV or XML

This feature can also be used to export your hire stock data easily, enabling you to export filtered parts of your data or all of it at once, the choice is yours.

How to Get a List

Before you export a list, you must first create an export key. This key is like a password that must be passed to get the list.  If you change the export key, any requests made not using the new export key, will be denied.

To get the export, you need a link, this you can get from the Hire Stock Management page.  By clicking on Menu and then Get data link, a box will appear with a link to get a list for the current filtered view.  To get the export link, you must be authorised to get it in the user permissions.

If you apply any filtering in the Hire Stock Management page, this filter will be the data the generated link will produce.  So for example, if you select a category and then get a data link, the data produced by the link will be all the stock in that category, just as it is listed on the page.

The data returned by HireHop includes the name, an image link, quantity, category, weight, dimensions, prices, part number, etc.

Technical

https://s.myhirehop.com/modules/stock/stock_export.php?id=10&key=abc1234def&depot=1&cat=0&sidx=TITLE&sord=asc&format=xml

The generated link will look something like above, and as you can see, it has various parameters that are explained below:

Parameter Meaning
id This is a unique ID for your company.
key The generated export key.
depot  An identifier for a depot (zero means all depots), to get the quantity.
cat The identifier for a category
cat_name The name of a category
name The name search
del If set to one, deleted items will be listed
unq A unique ID of an item. If set, only one item will be returned.
sidx The column to sort by
sord The sort order; asc = ascending & desc = descending
format The format the data will be returned in, being XML, CSV or JSON (default)

To load the data into your web page, you can Ajax it using JSONP, for example, with JQuery:

$.ajax({
    url: "https://s.myhirehop.com/modules/stock/stock_export.php?id=10&key=abc1234def",
    dataType: "jsonp",
    success: function( data ) {
        console.log( data );
    }
});

Please note, the service, pat test and test intervals are in ISO 8601 period formats and all dimensions and weights are metric.

Convert Seaward PAT Test Data To CSV – Seaward PAT Test Data To Excel Spreadsheet Online Tool

Many users of HireHop Rental Business and Asset Management Software have asked us how they can import their PAT test data from their Seaward PAT testers.  This can be done using the Seaward PAT Guard 3 software, however to save our users from having to pay for this software, we have added a small tool below where you can upload the ASCII text output file from your Seaward tester, and we will return the data in a CSV format that you can use to import into HireHop.

This format works with testers such as the Apollo, PrimeTest and SuperNova PAT testers, including the Apollo 600, Apollo 500, Apollo 400, Supernova Elite, PrimeTest 250+ range of testers.


Choose a file to convert by clicking the “Choose File” button.


What You Need To Know About GDPR – What Should You Do To Comply

GDPR - General Data Protection RegulationFrom 25th May 2018, the new GDPR (General Data Protection Regulation) rules regarding companies holding personal data will come into effect, and these new rules will effect companies of all sizes that hold data of any EU citizen, “personal data” being data stored on a computer or simply on paper!

So far, according to a survey conducted by the law firm Irwin Mitchell, only 30% of companies have prepared themselves for what is to come, meaning that many firms would probably go out of business if they received the maximum punishment of 4% of their annual turnover, limited to €20 million ($24 million), enforced by the ICO (the Information Commissioner’s Office).

Many companies remain blissfully ignorant and think the regulation doesn’t apply to them, as they don’t store information on a computer, or due to Brexit the rules won’t apply or they feel things are fine as they are.  They are probably wrong, as all companies store personal data, whether it be employee, marketing or customer information, and as these rules come in before the UK leaves the EU, it will be written into UK law as well.

What Is GDPR

  • GDPR are rules companies have to abide to when they hold personal data or information of EU citizens.
  • They give power to the people over their personal data and give them more rights, making companies more accountable.
  • They also simplify the regulatory environment for international business by unifying the regulation within the EU, so even if you are outside the EU, it could still apply to you.
  • The regulation covers how you must securely keep data, how it should be exported and what you must do if you have a data breach.
  • With GDPR, a person must give you consent to hold their data, they have the right to demand changes to it and they have the right to order you to delete or destroy it.

What Can Happen

All companies must keep all personal data of their customers, employees, etc. safe. If any personal data held on an EU citizen is compromised, it must be reported to the ICO within 72 hours of the breach, otherwise the business or organisation will be fined upto €20 million. If they find that security of your data was lax or you held on to data that should have been deleted, you can be also fined, and even sued by the individual whose data you held onto.

What do I need to do?

GDPR - What to do nextAny business that processes or holds any personal data (online or on paper) should review how it handles that data, where it is stored, how safe it is, whether it is shared with third parties and whether it is actually needed.

A good first step is to carry out an impact assessment. This should focus on three main areas: how employees control and process the data; processes (how you obtain the data, where you store and send it); and reducing risk (ensuring you have adequate security and data encryption in place).

Under the GDPR you only have to notify the ICO of a breach where it is likely to result in a risk to the rights and freedoms of individuals. An example being a breach that is likely to have a significant detrimental effect on individuals. A list of first names might not be detrimental, but a list with dates of birth and/or contact details will be. The ICO provides the following guidelines to what might constitute a detrimental effect:

  • result in discrimination,
  • damage to reputation,
  • financial loss,
  • loss of confidentiality
  • or any other significant economic or social disadvantage.

Again, it is vitally important that any breaches that may or do match any of the above points, must be reported to the ICO within 72 hours of the organisation becoming aware of it.

For example, employee data, such as assessments, do you need to keep them after they have left your employment?  If the employee hasn’t asked that you keep them, after a period of time, it would be wise to destroy or delete them. You must also grant the employee or ex-employee access to all data you hold on them so they can ensure that it is accurate and to raise any concerns on its validity or accuracy.

Exceptions

There are some exceptions to GDPR when it come to the right to be forgotten, for example if you decide to keep employee performance records for a period of time following their resignation, in case of a future legal claim against you, or there is an ongoing dispute where it is evidence.  However, you should be clear on what you will hold onto and make sure that it is destroyed when it is no longer needed.

Is My Equipment Rental Software Safe

If you are using software to store data and run your business, you must make sure that they store your data securely and that their login infrastructure is secure. If you do not use cloud software, you must make sure you have regular off-site backups, that the servers are in a locked and secure room (someone stealing a server or a hard drive is a data breach). You also need to perform regular virus checks on the server and all connected computers, make sure your firewall is setup, maintained and active, as well as a host of other requirements.  If you are using cloud software, then most of these requirements are alleviated and all you really need to worry about are login details not being kept secret, which is mitigated with MFA (see below).

What Personal Information is Covered Under GDPR

GDPR covers personal information about an individual being anything that can be used to identify them, such as their name, address, personal email address, identification number (such as passport number), location data (like tracking information from a phone), medical records etc.  What is not governed under GDPR is company information like a registration number, company address, a generic company email address (like accounts@email.com) or anonymous data about a person (this could even be medical data as long as the person it belongs to can’t be identified).

How Long Can I Hold Data According To GDPR

The time data can be held varies depending what the data is used for, and there is no set or specific time period set-out by GDPR.  The rule of thumb is that data should be erased a soon as it is not needed, kept for the shortest time possible, however there are many exceptions.

When it comes to business, you are required and/or allowed to keep the information for Tax, fraud, research, scientific, public interest and possible litigation reasons, etc.  You are also allowed to keep the data for reference reasons for your own internal use (you often need to reference old jobs to see what you supplied for example), however once the information becomes useless, you are required to only delete the information that identifies a person associated with the job. For example, with a hire company, you often have repeat business, sometimes over many years, and it may be necessary to see what you previously supplied them and for what price, so for this reason, you would be allowed to hold onto the data. If the customer vows never to use you again, after you have kept the data long enough to satisfy the tax authorities (sometimes 7 years according to the IRS) and the data is no longer needed for litigation, etc., you should erase their name, contact details and any correspondence from the job that can identify the customer.

What if I Hold Information for Marketing?

Not surprisingly, this is a little bit grey, but this is best we can make of it.  The collected information you hold is used and required by you for as long as you use it for marketing, therefore you are allowed to keep it, however the person has a right to unsubscribe from receiving marketing material from you.  If they have unsubscribed, the information that identifies them (like an email address) is not needed anymore, however some data, like how they responded to campaigns, is needed and you can keep it, as long as that data is anonymous (meaning you can’t identify the person it belongs to).

HireHop is Safe and GDPR Compliant

GDPR Compliant

All data stored within the HireHop cloud software is stored on Amazon Web Services RDS and S3 servers (trusted by NASA, Netflix, UK Ministry of Justice, etc.).  All data stored by HireHop is encrypted behind firewalls, and is backed up on a daily basis, all protected by a multi-billion dollar security infrastructure in worldwide data centres. HireHop also adopts a two step login, and limits login attempt with timeouts to prevent hackers from mounting a brute force attack to assess passwords.  To help you with GDPR compliance, all passwords stored on HireHop are encrypted, HireHop allows the contacts in your address book to unsubscribe from mailing lists simply by clicking an optional unsubscribe link in emails you send them, and you can limit your users to only be able to login at certain locations.

One security weakness in many organisations is that staff tell each other their passwords, and when one staff member leaves, even though you may have disabled their account, they still might know another member of staff’s login details. To combat this HireHop now offer sign-in with Google and Microsoft, and with both of these you can enable MFA (Multi Factor Authentication). The advantage of this is that with MFA, the member of staff not only needs their password to login, but also their mobile phone needs to be at hand.

HireHop has also implemented a personal data erase feature, however as HireHop has only been released for 1½ years up to when this article was written, and all data held must be held for at least 7 years for tax reasons, the feature is currently not enabled so as to save our customers from making foolish mistakes.


To find out more, see the ICO’s 12 step guide at https://ico.org.uk/media/1624219/preparing-for-the-gdpr-12-steps.pdf.

Disclaimer: Nothing on this site constitutes legal advice. Specialist legal advice should be taken in relation to specific circumstances. The contents of this site are for general information purposes only.

HireHop Cloud Software for Hire and Rental Companies – How to Guides

Here at HireHop we want our users to make the most of our powerful software, keeping you up-to-date with all the latest features and advances – and leaving you with the tools to ensure your hires and rentals are managed as efficiently as possible.

We will continue to update this page with how to guides and useful information, as well as tips and tricks, so please check back for all the latest!

Rental Equipment Software – Open Ended Hires and Late Returns

Late rental return
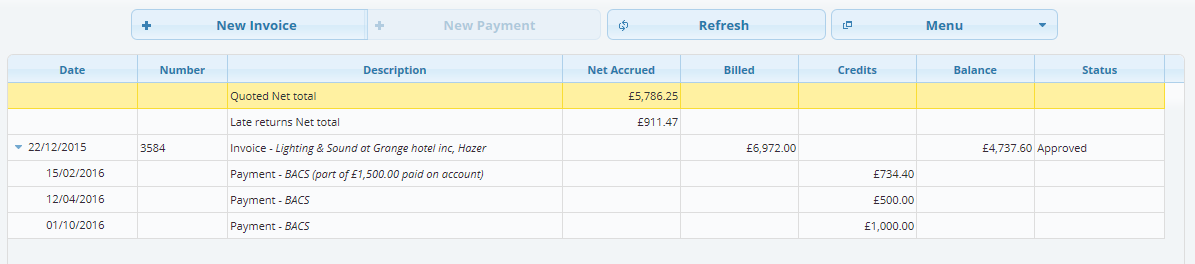
Every hire and rental company suffers from customers returning items late, yet most software handles this in a haphazard way, usually by creating new jobs with the late returns, which can cause calculation errors, as well as a multitude of other problems.  Also some customers rent a bunch of items indefinitely (an open ended hire) and may return different items at different times, imagine how many jobs you would have to create for that scenario.

HireHop have made this process simple and intuitive, the way it should be.

If an item is late, HireHop will tell you how much is due and allow you to add at the press of a button all overdue charges. This enables you to make the informed decision as to whether or not you want to charge the client and by how much. All this is done from within one job without the headache of having to have multiple jobs just to handle one small hire. Charges and payments breakdown

HireHop will tell you how many items on future jobs might be late, enabling you to judge whether or not you can supply that item or will have to substitute it or sub a replacement in to cover your commitment.

For jobs that are open ended (have no determined end date) HireHop, allows you to periodically issue multiple invoices (or one invoice) whenever you choose, as well as allow items to be returned over various dates. HireHop will seamlessly breakdown and tell you what you need to charge for and by how much, all at the press of a button and all within the same job.

At HireHop we want to give you software works around you and makes your life easier, not the other way round.